Tuesday, July 31, 2012

How To: Throw a Party for the Olympic Opening Ceremony

Since the Olympic Opening Ceremony is an event that only happens once every two years...and since I have admitted to the fact that we like to celebrate the lesser-popular holidays, what makes more sense than to host an Olympic Opening Ceremony party? Um, nothing!


So I consider us to be a bit of a trailblazer when it comes to hosting an Olympic Party.  Not because we are the first to do it, but because there are so few creative ideas out there in the Cyber World on how to do it.  Really.  We scoured Pinterest and blogs for months for ideas, but nothing really seemed that clever.

So, we pretty much had to come up with our own ideas!  The basic principle behind our party: Olympic Rings, Games, and Countries.
Cropped transparent version of Image:Olympic f...

Before I get started on the details of the party, how about a little Olympic Trivia? Did you know:
  • The five Olympic rings represent the five parts of the world involved in the Olympics during 1912?
  • London is the first three-time host of the Olympic Games (1908, 1948, and 2012)?
  • The official Olympic uniform of the athletes in ancient Rome was the birthday suit?
  •  The great philosopher Plato was a two-time winner of the Pankration?
  • Only five countries have been represented at ALL the summer games: Greece, Great Britain, France, Switzerland, and Australia?
  • More athletes than spectators attended the 1900 Paris Olympic Games?
  • The country of India has the lowest number of total Olympic medals per capita?
  • Females are given "sex tests" to confirm their gender?  In fact, the only female competitor not to have to submit to a sex test at the 1976 Summer Olympics was Princess Anne of the UK, who was competing as a member of the UK equestrian team. As the daughter Queen Elizabeth II, such a test was seen as inappropriate.
Ok, now that you have some fun fodder for entertaining your guests at your own Olympic party, I will continue with the details of How to Throw An Olympic Party.

The Drinks


For our cocktails, we went pretty simple.  We soaked Lifesaver Gummi Rings in the colors of the Olympic Rings in grape-flavored vodka for two hours (until they doubled in size).  Then, our guests could opt to eat the "Olympic Rings" like a shot, or add them to champagne.  It was very good with the champagne! 


The Menu

Originally, we were going to do a menu of British food in honor of the games, but we scratched that idea because British food sucks (I know, I spent a semester studying there.  30 pounds and broken taste buds later, I declared, "no more!").  Instead, we opted for dishes inspired by countries around the world: Greece, Japan, China, Britain, and Italy.  Here was what we decided on:

Italy- Caprese Appetizer

Cut cherry tomatoes in half, and spork with a toothpick, adding basil and mozzarella.  Just before serving, drizzle with olive oil, balsamic, and salt.

China - Lettuce Wraps

Click Here for Delicious Lettuce Wrap Recipe. Pre-make the sauce and chicken, then reheat before serving.  This is a crowd favorite!  I promise!

Britain - "Chips"

I bought high-end(ish) french fries in the freezer section, baked them and coated them with seasoning salt, and then put appetizer potions in little shot glasses with ketchup in the bottom.  My sister snagged this idea from Pinterest and it was just too cute!  The topper?  I used shotglasses I had collected from all the countries we visited, so each person could root for a country based on the shot glass they took.

Japan - Edamame

This is my secret recipe for a five-minute appetizer.  I use it all the time!  Heat 1 TBSP of Sesame Oil on high in a pan.  Add a bag of frozen Edamame (Soy Beans, I like the ones from Trader Joe's) and cook until tender and warm on the inside.  Fry in 3 - 4TBSP of Soy Sauce, and then top with fresh ground salt.  Delish, filling, and low cal!

Greece - Crockpot Greek Dip


This one is awesome, so I have to put the recipe here.  Combine 1 package of low-fat cream cheese, 1/3C of light mayo, and 1/4C of nonfat milk in a crockpot and stir until melted and well-mixed.  Add 1 TBSP of lemon juice, 1 bag of frozen spinach, 1/2C lowfat Feta cheese, and 1/2TSP of Oregano. Cook for 2 hours on low heat in a crock pot.  Reduce cooker to warm and add 1/4TSP pepper, 1/4C of pitted, diced Kalamata olives, 1/4C of diced cucumber, 1/4C of diced red onion, and 1/4C of diced grape tomatoes (I diced all the veggies ahead of time, then added them before serving).  Serve with warm pita bread, broiled in the oven and coated with a spritz of olive oil, garlic salt, and Parmesan.

Dessert - Coconut Lemon Cake

You know, this is not the prettiest cake in the world, but it did taste good.  I took basic white cake and added coconut extract and grated lemon peel to it.  Then I fluffed up store bought white frosting in the mixer, added lemon juice and coconut extract and frosted it. I made a flag out of blueberries and strawberries and then used giant gold-wrapped chocolates as medals.  Not quite what I imagined, but at least it tasted good.

The Games

I decided that most of the time would be taken watching the opening ceremonies, but I wanted something to do while watching commercials.  So I made a list of Minute To Win It games, and printed out instructions and game packets ahead of time.
Some of the games included "Olympic Toe Rings", where each person draws the Olympic Rings with their feet; "Why the Long Face", where you move a cookie from your forehead to your mouth using only your facial expressions; and "This Blows", where you blow a bubble and then move it across the room by blowing on it before it pops.

I hope that this little blog helps everyone host this fun idea for a party.  We had a great time, and you will too!  Go team USA!

Wednesday, July 25, 2012

Could I Possibly Be a Winner?

If you enjoy my blog, please consider nominating it for the Country Living Blue Ribbon Blogger Awards. It will help with readership...and that's a good thing!

To Nominate, Follow this Link: https://www.surveymonkey.com/s/blog-nominator2012

Tuesday, July 24, 2012

Goldie Locks and the Three Desserts

As I have not so subtly hinted before, I am not much of a dessert person.  I just tend to shy away from the sweet stuff.  But since going back on Weight Watchers which cuts my wine habit in half, I have been fulfilling my wine cravings with summer pies.  I'm not sure this is a good thing for the waist line, and am thinking of retreating back to the alcohol for my waistline's sake. 

Not that I haven't found yummy, low-point desserts in the meantime!  But we managed to make three--yes three--desserts in seven days last week.  Yikes! 

You know the story of Goldie Locks? Well this is the the Weight Watcher version of that story and I am Goldie Locks and this is my guide to desserts.

This one was too sweet (and really, really bad for you!).


A coconut creme pie with fresh coconut from the bulk section, fresh whipped cream, and the secret...extra thick pie crust made by doubling (yes, twice the butter, shortening and flour) the Crisco crust recipe. We tried to use a coconut milk whipped cream recipe I found on Pinterest, but guess what...it didn't work.  Liers! I just wasted $4 in coconut milk!

This one was too bland.


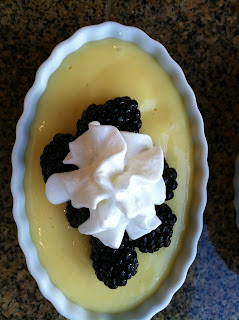
I used sugar-free vanilla pudding with fat-free milk and topped it with fresh black berries and fat-free whipped cream (from a can, in the dairy aisle--very good!).  Though the berries dramatically helped, overall it was pretty bland.  Though at 35 calories, I can't complain too much.  My sweet tooth did relent after eating it.

This one was just...right.

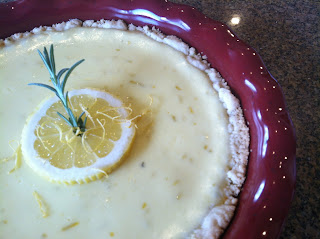
How about this fancy pic!  I'm getting better with my iPhone!

I found this recipe on Pinterest as well, and Bravo! it was delicious.  If you like lemon bars or tart foods, this one's for you.  It's incredibly easy and although the crust is a little heavy on calories, the filling is actually not that bad for you since it's made with Greek Yogurt and very little sugar.  In fact, I might recommend the filling on a reduced-fat graham crust or even philo dough!

It is delicious, and a must try!!!  Bonus points if you grow your own Rosemary.  So here's the recipe for this Lemon Rosemary Tart. 
 Lemon Tart with Rosemary Crust
Created, photographed, and shared by Good Things Grow
for the crust
  • 1 1/3 cup spelt flour
  • 3 tablespoons cane sugar
  • 1 tablespoon fresh rosemary, chopped
  • pinch of salt
  • 1/3 cup cold butter, cubed
  • 1-2 tablespoon ice water
for the filling
  • 1 cup plain Greek yogurt
  • 1/2 cup cane sugar
  • 2 eggs
  • 1/2 cup fresh lemon juice
  • 1 teaspoon lemon zest
Preheat the oven to 350˚F. Lightly butter a 9-inch tart pan and set aside.
Place the flour, sugar, rosemary, and salt in the bowl of a food processor and pulse a few times. Add the butter and pulse until little pea sized bits start to form. Add in the ice water, starting with just 1 tablespoon. Pulse a few more times, then check the dough to see if it holds together when pressed between your fingers. If not, add the 2nd tablespoon. The dough may still seem crumbly, but as long as it holds together when pressed it will be perfect.
 Dump the dough out into the prepared tart pan. Starting from the center, work your way out to the sides by pressing the dough firmly into the pan. Make sure you press it up along the sides evenly. Pierce the bottom with a fork a few times and place in the oven to bake for about 15 minutes. Cool on a wire rack for at least 5 minutes before filling.
Meanwhile prepare the filling. Place the yogurt and sugar in a bowl and whisk until thoroughly combined. Whisk in the eggs, one at a time, then add the lemon juice and zest. Whisk until smooth and everything is evenly combined.
Pour the filling into the crust and bake in the oven for 25-30 minutes or until the center is set and only slightly jiggles when shaken lightly.
Allow to cool completely then place in the fridge to chill for at least 1 hour before serving. Tart can be made the day before and kept covered and chilled in the fridge. Serve with fresh whipped cream if you’d like.
via HappyYolks.com

Thursday, July 19, 2012

Jamaican Me Crazy Jerk Chicken

I first tried Jerk Chicken when my husband and I were in Ocho Rios, Jamaica.  Ok, so no surprise there.  But I just loved the crispy skin, the spicy rub, and moist center.  At the time, I could barely cook more than a Grilled Cheese Sandwich, so I never anticipated learning to cook it myself.

Luckily, my technique got a little better with age, and by the time I found this recipe, I was ready to take it on.  I've been cooking BBQ Jerk Chicken for more than two years now, and it's a favorite in our household.

You can use boneless, skinless chicken breasts, and I'm sure it will taste just fine.  But this is one recipe that I opt to use chicken drumsticks: bone, skin, and meat in all it's cholesterol-filled glory!  After all, there are just some times you need the extra taste, like cooking the stuffing in the bird!  Not to mention, fresh drums are super cheap. So, enjoy picking up the drum, eating with your hands, and biting into the skin.  It's still only 3 Weight Watcher Points per leg.

Jamaican Me Crazy Jerk Chicken


Effort Meter (1 to 5): 2
Delicious Meter (1 to 5): 4.5
Serving Suggestion: I personally like a mashed potato and corn on the cob, but you could do peaches, plantains, or grilled bananas, too.  Pictured here with Corn on the Cob and a Cilantro/Cayenne/Garlic Butter, and Cucumber, Onion, and Tomato Red Wine Vinaigrette Salad.
Weight Watcher Points - 3 Points for a single drum.


Ingredients:

4TSP Garlic Salt
2 TSP Onion Powder
1TSP Ground Ginger
1TSP Ground Thyme
1TSP Allspice
1/2TSP Salt
1/2TSP Nutmeg
1/2TSP Red Pepper Flakes
1/4TSP Black Pepper
1 Family Packet of Fresh Chicken Drumsticks

Instructions:

1. Make a rub by combining all of the spices together.  Place in a large Ziploc bag.

2. Add drums to the bag and shake until evenly coated.

3. Let rub absorb into chicken by letting the chicken get to room temperature before grilling.  Grill on medium-low heat until thoroughly cooked. Enjoy!

Tuesday, July 17, 2012

5 Ways to Make Life Easier in Less Than 5 Minutes

You know those women who claim they can "do it all?" Well, they are no better than you or me, they just have better tricks of the trade.  With a domestic tool belt, everyone can find more time to do more...and setting up these tools doesn't take long.  Less than five minutes, in fact!

So here's my new feature series, "How to Make Life Easier in Less Than Five Minutes."  The addition of a child, business, and blog has taught me a thing or two about organization, and together with my modern family, we have pulled together some great ideas that really cut down on time, while helping organize our lives!


Making Life Easier in Less Than Five Minutes:

 1. Label Your Garbage Cans. You are probably laughing at this one.  But how many times have you gone to throw something away at a friend's house and couldn't figure out which garbage was the recycle bin, and which was the regular trash?  There's such a simple solution!  Just take a marker to your garbage bins and label one "Recycle", one "Trash", and one "Glass/Cans." Done!  You will never be asked that question again!

2. Put Favorite Liquids into Easy-Pour Bottles.  If you spend a lot of time in the kitchen, you can cut down on time searching for your favorite liquids and sauces by putting them in glass bottles and buying easy-pour spouts on them (commonly used for oil, vinegar, and alcohol).  I found these pretty glass bottles at Ikea, Ross, and Pier 1 Imports all for less than $10, then I found a bag of easy-pour spouts at the Dollar Tree ($1 for apack of 12). 
  
I added my favorite liquids--Balsamic Vinaigrette, Soy Sauce, and Olive Oil--and whoa la! Pretty enough to stay in close reach on the counter and ready for the next pasta, salad, or stir fry.


3. Make Your Own Snack Bags.  I have fallen victim to the 100 Calorie Packs.  Then I realized that I can make my own.  Not only is this a lot cheaper, but it helps with portion control, I can choose my favorite foods, AND I can recycle the snack bags.  When I buy a bag of Veggie Chips, pretzels, Chex Mix, or other snack food (even cookies!), I measure out 2-3 Weight Watcher Points worth, bag up the entire contents, and label each baggie with the number of points.  It's great for quick snacking on the go.  You can even do this using small Tupperware and yogurt, hummus, and cheeses.  This is one of my Rules to Weight Loss.

4. Plant Herbs. Contrary to popular belief, you do not have to have a green thumb to grow herbs.  Thank goodness, because I love fresh herbs in my house.  It fills the entire kitchen with smells of Italy, makes cooking with fresh herbs as easy as a "snip" away, and I never have to go to the store for fresh basil, thyme, or sage.  These are the three herbs I recommend because they are hardy and produce a longer harvest than say, cilantro.  Plus, a $2.99 Basil plant from Trader Joes can be harvested for up to three months, which saves money too!  And, if you have more than you need, you can always...(see next tip)...

5. Freeze Fresh Herbs in Olive Oil.  I found this idea on Pinterest and I love it!  Using ice cube trays or these little tiny Tupperware containers (12 for $1 at the Dollar Tree), chop extra fresh herbs and place at the bottom of the containers.  Then, fill 1 or 2TBSP of Olive Oil and freeze.  The oil helps preserve the fresh herbs. When needed, drop into your favorite recipes--soups, pastas, sauces, dips--and you have a pre-measured oil/herb mix.

Bonus Tip: Tick Tac Box of Bobby Pins.  I always have bobby pins hanging around and they end up lost in the carpet, vacuum cleaner, a dish on nightstand.  But you can place them in a Tick Tac box and they are both easy to access and never get lost.  I love this idea!

Monday, July 16, 2012

One Year Blog Anniversary (and a recipe to celebrate)!

You know, even if another person never read this blog again, I'd still write it.  Why write something no one may read you may ask?  Because each time I look up one of my recipes, it takes me back in time.  I remember the tastes, the smells, the occasions, and the people who sat down with me and enjoyed every flavor I've brought to the table, or project I've labored over.

This is my virtual journal, and I'm so glad to be able to bring people along for the ride.  It makes me thrilled to think that someone half a world away could find a recipe and share it with their loved ones too, making different--and wonderful--memories with the same combinations of butter, garlic, olive oil, and herbs.

In fact, did you know this week marks the one year anniversary of this blog?  Yes, "Happy Birthday To You, Newly Domestic." You have survived an entire year without boring of projects, recipes, or things to write about!

So to celebrate, I have a special recipe for you.  Now, I've revealed in the past that I am not actually much of a fan of desserts.  But when I find a dessert that is a) easy, b) delicious, and c) only 68 calories, that's a dessert worth of...well, an anniversary post!

I found this recipe (which I of course modified to make more WW-friendly!), and the original recipe stated that it called "Pavlova."  Apparently, I'm not fancy-schmancy enough to know what "pavlova" is,  but I do know what meringue is, and let's just call a spade a spade.  It's fancy meringue!  Even Wikipedia is with me on this one.  They state that pavlova is a "meringue-based dessert named after the Russian ballet dancer Anna Pavlova. It is a meringue dessert with a crisp crust and soft, light inside."

So here you go fellow domestics...a indulgent dessert to celebrate our anniversary, Weight Watcher Style!

68-Calorie Berry Meringue

Effort Meter (1 to 5): 3 
 
Delicious Meter (1 to 5): 5
 
Weight Watcher Points -  ONE POINT!  Yes, ONE POINT for 1/8th of the Meringue; Two points if you add non-fat whipped cream to top


Ingredients:

1/2 C Splenda
1/2 C Sugar
2 TSP Cornstarch
1/8 TSP Salt
3 Egg Whites
1/4 TSP Cream of Tartar
1/2 TSP Vanilla Extract
1 Cup of Raspberries (Fresh or Frozen, I used frozen)
1 Cup of Strawberries (Again, Fresh or Frozen, I had overripe fresh ones I used)

Instructions:

1. Preheat oven to 250.  Line a baking sheet with wax paper and draw a circle onto the paper using a large bowl turned upside down.

2. In a small bowl, combine 1/2C of Splenda, 1/4C of sugar, cornstarch, and salt.  Mix together and set aside.

3. In a mixing bowl, beat three egg whites and cream of tartar until peaks form.  You will want to make sure there is no moisture in the bowl or on the beaters before mixing, or peaks may not form. Add sugar mixer 1 TBSP at a time (boy, am I glad to have a KitchenAid Mixer for this!) on high speed until entire mixture is added, then add vanilla extract.  Beat until glossy and stiff-peaked, about five minutes.

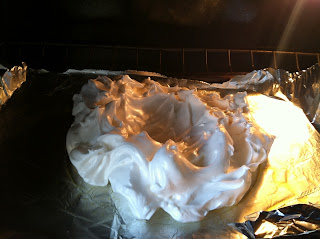
4. Transfer egg mixture (meringue) to inner circle of waxed paper with a spatula, making a volcano shape with the meringue (circular bottom with a dip in the center).  Bake at 250 for one hour.  Let cool in the over by turning the oven off after one hour and cracking the door.

5. While cooling, combine strawberries and 1/2 C of the raspberries plus remaining 1/4C of sugar into a saucepan.  Add 1 TBSP of water and bring to a simmer over medium heat.  Cook until sugar is dissolved (three minutes).  Stir in remaining berries and pour into a bowl to cool (or place in refrigerator.

6. Place egg mixture into the fridge until ready to serve.  When ready to serve, transfer the meringue to a plate and place raspberry mixture into the center dip of the meringue.  Serve with fresh mint (if desired) and non-fat whipping cream.