Showing posts with label Dessert. Show all posts

Wednesday, June 25, 2014

No-Bake Blueberry Lime Cheesecake Bite Dessert

No-Bake Lemon Cheesecake Bites
I think there are two kinds of people in the kitchen: those who can bake, and those who can cook. I fall into the latter.  So, the only kind of dessert I can make well is one that has very "baking" involved.

So this is my version of dessert, and I surprised to find that it actually was much better than many "cooked" desserts.  The whole thing took just a few minutes to make and I had all the ingredients already in my cupboard (double bonus!).

No-Bake Lime Blueberry Cheesecake Bites

Ingredients:

12 Muffin tins
3/4C graham cracker crumbs
3TBSP butter, melted
8oz cream cheese, softened (I used fat-free)
1 (14 oz.) can sweetened condensed milk
1/3C juice from a fresh lime, lemon, or both!
2 packets Splenda or Equal
2TSP  lime/lemon zest
Handful of blueberries, halved
8 oz container frozen whipped topping, thawed


Instructions:

Line 12 muffin pan cups with paper liners.

In a small bowl, combine graham cracker crumbs and and melted butter. Press one tablespoon of crumbs into the bottom of each liner.
With an electric mixer on medium speed, beat the cream cheese until smooth. Add the condensed milk , lemon/lime juice, and Splenda and mix well. Check for taste, if not sweet enough for you, add a touch more sugar.
Fold in the lime zest, blueberries, and 1 cup of the whipped topping.
Divide the mixture evenly among the lined muffin cups. Cover pan with foil or plastic wrap and refrigerate until firm, at least 3 hours.
When ready to serve, garnish with whipped cream and sliced lime or blueberry, if desired.

Tuesday, July 9, 2013

Super Yummy, All Natural Granola Bars

Just in time for summer snacking--or maybe a little early for Back-to-School--I found this recipe for homemade granola bars (YUM!) and I just had to try it.

Why make your own granola bars?
  • Easy-peasy
  • Much more delicious
  • Very filling
  • You can cut them into mini-calorie portions
  • You can supplement them for a healthy dessert
  • They are no-bake
  • You can make them minus the nasty ingredients (like raisins...YUCK...I hate raisins in my granola)
The recipe calls for 2 cups of granola.  I outdid myself by making my own granola, but turns out it's pretty easy.

Homemade Granola

Ingredients: 
2 1/2C rolled oats
1C assorted nuts (I used almonds and pecans)
1/4C seeds (whatever kind you like...I was out so I doubled the sesame seeds and flax seeds)
2TBSP sesame seeds
2TBSP flax seeds
1C coconut (shredded sweetened)
1/2 TSP Cinnamon
1/2TSP Nutmeg
1/2TSP Allspice
1/8 tsp salt
1/2C coconut milk or oil
2TBSP lowfat butter (melted butter)
1/4C honey

Combine wet ingredients (milk/oil, melted butter, honey) in a large bowl and mix well.  Add spices (cinnamon, nutmeg, allspice, and salt) and mix well.  Stir in seeds, nuts and oats and mix well.

Spread granola mixture on a greased (or lined with parchment paper) large baking sheet and cook at 350 degrees for about 20 minutes until golden brown.

Homemade Granola Bars

Ingredients:
4 tbsp. (1/2 stick) unsalted butter or coconut oil 1/4 cup packed light brown sugar or brown rice syrup 1/4 cup honey 2 cups plain granola 1 cup rice cereal (Rice Krispies, etc.) 1/4 cup semisweet chocolate chips 1/4 cup peanut butter chips - See more at: http://backtothecuttingboard.com/dessert/no-bake-chewy-granola-bars/#sthash.AOOM7IaC.dpuf
4TBSP lowfat butter or thick, canned coconut milk (I used coconut milk)
1/4C brown sugar
1/4C honey
2C granola
1C cereal (like Rice Crispies or Chex...I've even used Frosted Flakes)
1/4C chocolate chips
4 tbsp. (1/2 stick) unsalted butter or coconut oil 1/4 cup packed light brown sugar or brown rice syrup 1/4 cup honey 2 cups plain granola 1 cup rice cereal (Rice Krispies, etc.) 1/4 cup semisweet chocolate chips 1/4 cup peanut butter chips - See more at: http://backtothecuttingboard.com/dessert/no-bake-chewy-granola-bars/#sthash.AOOM7IaC.dpuf

4 tbsp. (1/2 stick) unsalted butter or coconut oil 1/4 cup packed light brown sugar or brown rice syrup 1/4 cup honey 2 cups plain granola 1 cup rice cereal (Rice Krispies, etc.) 1/4 cup semisweet chocolate chips 1/4 cup peanut butter chips - See more at: http://backtothecuttingboard.com/dessert/no-bake-chewy-granola-bars/#sthash.AOOM7IaC.dpuf
Line or grease a shallow baking sheet.

In a large saucepan over medium heat, combine butter/milk, brown sugar and honey and stir until liquid (about two minutes).  Remove from heat. Slowly stir in cereal and granola and mix until well-combined.

Spoon mixture onto baking sheet and use a rolling pin to flatten to desired thickness.  Let cool for about 5 minutes and then press chocolate chips into the surface using a spatula.  Cool in the fridge for another 5 minutes and them slice into bars using a sharp knife.
Combine butter, honey and brown sugar in a large saucepan over medium heat. Stir until the butter is melted. - See more at: http://backtothecuttingboard.com/dessert/no-bake-chewy-granola-bars/#sthash.AOOM7IaC.dpuf
4 tbsp. (1/2 stick) unsalted butter or coconut oil 1/4 cup packed light brown sugar or brown rice syrup 1/4 cup honey 2 cups plain granola 1 cup rice cereal (Rice Krispies, etc.) 1/4 cup semisweet chocolate chips 1/4 cup peanut butter chips - See more at: http://backtothecuttingboard.com/dessert/no-bake-chewy-granola-bars/#sthash.AOOM7IaC.dpuf

Wednesday, February 20, 2013

Mardi Gras Jambalaya: Easier to Make than To Spell!

jambalaya
Shrimp and Turkey Sausage Jambalaya
Last week was Mardi Gras--or more accurately named--Fat Tuesday.  Fat Tuesday is how I like to think about it because it's a reason on a Tuesday night in February to splurge with mouthfuls of sausage, shrimp, and rice!

Last year for Mardi Gras, I made a southern, Louisiana tradition: Low Boil.  Mostly, I made this because it is easy, delicious, fairly low in WWPoints, and is about the only southern dish I know how to prepare.

Fried Apple Pie Roll-ups
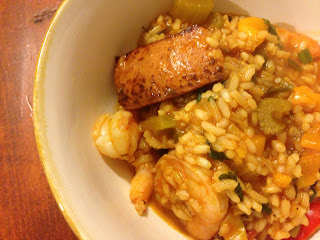
This year, I felt a little more adventurous, so I tried making Jambalaya for the first time.  The pro's of Jambalaya?  I had practically all the ingredients already, it makes a ton, and it seems to be a fairly healthy dish if you substitute the rice for a brown (or other high fiber) rice and the sausage for turkey kielbasa. The cons?  Well, it is a lot of steps, and if you don't follow the recipe carefully, it can be difficult to pull off.

So I mentioned that I "nutritioned up" the original recipe.  This much is true, however, I followed the dinner up with fried apple pies, so I think I cancelled out my efforts.  Regardless, both recipes are here.  If I was judging my own cooking on this one, I think I deserve to be thrown some beads!

Shrimp and Kielbasa Jambalaya

Ingredients:

1TBSP olive oil
1 pound turkey kielbasa sausage
1TBSP butter or lowfat margarine
1 white onion, diced
1C diced celery
1 green bell pepper, cored and diced (I used mini-sweet peppers)
1 red bell pepper, cored and diced
1C diced tomato
3 garlic cloves, minced
1 jalapeno pepper, seeded and minced
2TSP diced oregano
1TSP thyme
1 small can of tomato paste
6C chicken stock or bouillon
3C long-grain or brown rice, rinsed
3 bay leaves
2TSP salt
1TSP ground black pepper
6 to 8 dashes Tabasco hot sauce
1/2C chopped scallions, divided
3/4C chopped fresh parsley, divided
1/4C freshly squeezed lemon juice
1 pound medium or large shrimp

Instructions: 

1. Heat the oil in a black iron pot over medium heat, add the kielbasa and saute for 8 to 10 minutes, until browned. Remove the kielbasa to a bowl, and set aside. 
2. Add the butter, onion, celery and peppers to the same pot/pan and saute for 8 to 10 minutes, until the onion is translucent. 
3. Add the tomato, garlic, jalapeno or cayenne, oregano, thyme, and tomato paste and cook until all the vegetables and herbs are blended well. 
4. Add the stock and bring to a rolling boil. Stir in the rice, and add the sausage, bay leaves, salt, pepper and hot sauce. Return to a boil, reduce the heat to low and simmer, covered, for 20 minutes. 
5. Add 1/4 cup of the scallions, 1/4 cup of the parsley, the lemon juice and the shrimp, and stir well. 
6. Cover the pot, remove it from the heat and allow the jambalaya steam, for 15 minutes, before serving.

7. Garnish with the remaining 1/4 cup scallions and 1/2 cup parsley, and a dash of hot sauce, if desired.

Fried Apple Pie Roll-ups

Ingredients:

12 small tortillas (I use Don Pancho)
4  small or two large apples (abut 2 heaping cups), peeled and diced
1TBSP butter
1 lemon, juiced
1/3C sugar
2TSP ground cinnamon
1/2TSP ground nutmeg
1/4TSP all-spice
1/8TSP salt

Instructions:

1. Combine butter and diced apples in a pan and sautee over medium heat until slightly softened.

2. Add lemon juice, sugar, cinnamon, nutmeg, allspice and salt.  Stir well and cook on low about 5 minutes.

3. Spoon about 1/4C of the apple filling into a tortilla a roll like a burrito.  Seal by placing some of the liquid from the apple pan on the edge of the tortilla.  It's so sticky it will seal it shut.  Repeat until you have filled all the apple pie rolls.

4. Cover the bottom of a pan with a small portion of canola oil.  Heat on high.  Once ready, fry the apple pie rollups in the pan, about 1-2 minutes on each side.

5. Serve hot, and top with whipped cream or ice cream for extra deliciousness.

Monday, July 16, 2012

One Year Blog Anniversary (and a recipe to celebrate)!

You know, even if another person never read this blog again, I'd still write it.  Why write something no one may read you may ask?  Because each time I look up one of my recipes, it takes me back in time.  I remember the tastes, the smells, the occasions, and the people who sat down with me and enjoyed every flavor I've brought to the table, or project I've labored over.

This is my virtual journal, and I'm so glad to be able to bring people along for the ride.  It makes me thrilled to think that someone half a world away could find a recipe and share it with their loved ones too, making different--and wonderful--memories with the same combinations of butter, garlic, olive oil, and herbs.

In fact, did you know this week marks the one year anniversary of this blog?  Yes, "Happy Birthday To You, Newly Domestic." You have survived an entire year without boring of projects, recipes, or things to write about!

So to celebrate, I have a special recipe for you.  Now, I've revealed in the past that I am not actually much of a fan of desserts.  But when I find a dessert that is a) easy, b) delicious, and c) only 68 calories, that's a dessert worth of...well, an anniversary post!

I found this recipe (which I of course modified to make more WW-friendly!), and the original recipe stated that it called "Pavlova."  Apparently, I'm not fancy-schmancy enough to know what "pavlova" is,  but I do know what meringue is, and let's just call a spade a spade.  It's fancy meringue!  Even Wikipedia is with me on this one.  They state that pavlova is a "meringue-based dessert named after the Russian ballet dancer Anna Pavlova. It is a meringue dessert with a crisp crust and soft, light inside."

So here you go fellow domestics...a indulgent dessert to celebrate our anniversary, Weight Watcher Style!

68-Calorie Berry Meringue

Effort Meter (1 to 5): 3 
 
Delicious Meter (1 to 5): 5
 
Weight Watcher Points -  ONE POINT!  Yes, ONE POINT for 1/8th of the Meringue; Two points if you add non-fat whipped cream to top


Ingredients:

1/2 C Splenda
1/2 C Sugar
2 TSP Cornstarch
1/8 TSP Salt
3 Egg Whites
1/4 TSP Cream of Tartar
1/2 TSP Vanilla Extract
1 Cup of Raspberries (Fresh or Frozen, I used frozen)
1 Cup of Strawberries (Again, Fresh or Frozen, I had overripe fresh ones I used)

Instructions:

1. Preheat oven to 250.  Line a baking sheet with wax paper and draw a circle onto the paper using a large bowl turned upside down.

2. In a small bowl, combine 1/2C of Splenda, 1/4C of sugar, cornstarch, and salt.  Mix together and set aside.

3. In a mixing bowl, beat three egg whites and cream of tartar until peaks form.  You will want to make sure there is no moisture in the bowl or on the beaters before mixing, or peaks may not form. Add sugar mixer 1 TBSP at a time (boy, am I glad to have a KitchenAid Mixer for this!) on high speed until entire mixture is added, then add vanilla extract.  Beat until glossy and stiff-peaked, about five minutes.

4. Transfer egg mixture (meringue) to inner circle of waxed paper with a spatula, making a volcano shape with the meringue (circular bottom with a dip in the center).  Bake at 250 for one hour.  Let cool in the over by turning the oven off after one hour and cracking the door.

5. While cooling, combine strawberries and 1/2 C of the raspberries plus remaining 1/4C of sugar into a saucepan.  Add 1 TBSP of water and bring to a simmer over medium heat.  Cook until sugar is dissolved (three minutes).  Stir in remaining berries and pour into a bowl to cool (or place in refrigerator.

6. Place egg mixture into the fridge until ready to serve.  When ready to serve, transfer the meringue to a plate and place raspberry mixture into the center dip of the meringue.  Serve with fresh mint (if desired) and non-fat whipping cream.

Tuesday, March 27, 2012

Candyland Cake

I just wanted to share this beautiful cake my hubby made for a neighbor of ours. His son turned four last week.
Candyland-inspired.


The inside was five layers: Red, Orange, Yellow, Green, Blue, and Lavendar.

Monday, March 19, 2012

How to Make a Pretty Mint Cake


Disclosure: I suck at baking.  The good news?  My husband is great at it!  So when preparing for Saturday's St. Patrick's Day party, I made the food, and he made the cake.

I found this great recipe on Pinterest for a Mint Chocolate Cake.  It turned out amazing (thanks to my hubby) and it was beautiful to boot.

Here's how you do it.


St. Patrick's Day Mint Chocolate Cake

Ingredients

Cake:

2 Boxes of White Cake Mix (and the eggs and oil to make it)
2 TSP Mint Extract, separated (we couldn't find plain "mint" so we used peppermint)
Green Food Coloring
2 TSP Unsweetened Cocoa Mix
Dark Chocolate Bar (like Hershey's)

Frosting:
1 Stick Softened Butter
1 Pound (Half a Bag) Powdered Sugar
1/4 TSP Salt
1 TSP Vanilla
1 Pint Whipped Cream

Instructions

Make white cake according to mix directions.  Separate into four bowls.  Leave first bowl as-is.  In second bowl, add cocoa mix.  In third bowl, add 1 TSP of mint extract and one drop of food coloring.  In fourth bowl, add 1 TSP of mint extract and four drops of food coloring.


Pour equal parts of the four cake mixes into two 9" cake pans, swirling with a spatula as you go to create a pretty swirled pattern.  Bake according to cake mix directions.  Let cool.


Once cooled, cut off the cake tops so each cake is perfectly flat on both sides.  We chose to keep one of the tops in place, so the cake had a dome shape, but good practice is to make it flat on top.  Make the frosting.


To make the frosting, beat the whipped cream until stiff.  Set aside.  In a mixer, blend butter and vanilla.  Mix together salt and powdered sugar and add to butter mixture.  Beat until well mixed.  Fold in whipped cream. 

Place frosting atop one of the cakes, and then stack the second cake atop the first frosted cake to create a double-layer cake.


Frost the outside of the cooled cake and refrigerate until time to serve.  Garnish with flakes scraped from dark chocolate bar.


Saturday, December 3, 2011

7 Days of Thanksgiving Recipes - The Best NY Cheesecake

This was by far the best dessert I've ever personally made.  I partly believe that's because I love cheesecake, and so I make it well, but the other part I give sole credit to my Father-in-Law's recipe.

(The Best) New York Cheesecake

Ingredients

Crust:
Graham Crackers
Butter (softened)
Brown Sugar

Cheesecake:
3 Eight ounce packages of softened cream cheese or neufachatel cheese
1 C Sugar
1 TSP Vanilla
4 Egg Whites (beaten stiff)

Topping:
1 Pint Sour Cream
2 TBSP Sugar
1/2 TSP Vanilla

Instructions

Make the graham crust with a combination of ground graham crackers, butter, and brown sugar.  Press into the bottom of a spring pan and bake at 350 for about 10 minutes.

Meanwhile, mix cream cheese, sugar and vanilla until smooth and well blended.  Fold in beaten egg whites.  Place over cooled graham crust and bake for 5 minutes at 475.

While baking, mix together sour cream, sugar, and vanilla.  Remove cheese cake from oven and top with sour cream topping.  Cool to room temperature and then refrigerate.  Serve topped with choice of fruit (I used cranberry topping) or sliced almonds.

Tuesday, November 29, 2011

A Very Merry Cranberry Thanksgiving Menu

I did it! I did it!  An entire Thanksgiving meal with not a burnt roll, soggy salad, or broken plate (however, two wine glasses and lever on the sink weren't so lucky).

We had a very quaint Thanksgiving dinner--just me, my husband, son, sister, mom, and dad.  Because it was a casual occasion, there was no set dinner time, which gave us the opportunity to take a leisurely walk down to Starbucks in the morning, snack on lettuce wraps and aspergras rolls in the afternoon, and have a 5pm (give or take a half hour) dinner.

I think the key to success for Thanksgiving dinner is:
  • Know what's ok to make ahead (cranberry sauce, green bean casserole, dessert)
  • Know what not to make ahead (turkey, salad, bread) and how to properly re-heat anything you do make ahead.
  • Pre-cut anything you can't make ahead.
  • Thaw your turkey early.
  • Don't have too many unique flavors that compete with each other.
  • Have a hungry audience so everything tastes good (i.e. lots of alcohol and don't serve lunch).
I will be sharing my favorite recipes from this meal with you over the course of the next week.  Just in time for Christmas!

The Menu:

Asparagus Roll-Ups
Lettuce Wraps
Blue Cheese, Walnut, and Cranberry Salad with Lemon Vinaigrette
Herb-Roasted Turkey
Mushroom Sausage Stuffing 
Rosemary Mashers with Gravy
Homemade Green Bean Casserole with Crispy Shallots (fan favorite)
Rhodes Rolls
Cranberries with Oranges
Sour Cream Cheesecake

I found that I didn't even have to put out the fine China.  My casual dinnerware matched the Harvest decor just fine!  But it was laughable that I actually had to think to remember what side the fork, knife, and glasses go on!

I placed fabric leaves under my recycled glass plates and added gold chargers (from the Dollar Tree) for a festive look.  I can't help but laugh every time I see a charger because it reminds me of this episode of "Cribs" where this basketball player was eating off a charger and was so happy he "found these really big plates).

The table (before we messed it up).

The food (before we ate it).  Dinner was comprised of Roasted Turkey with Herbs, Rosemary Mashed Potatoes and Gravy, Rhodes Dinner Rolls, Homemade Green Bean Casserole, Sage Sausage Stuffing with Mushrooms, and Cranberry-Orange Sauce.

Mmmmm.  My husband insisted on canned cranberries (which no one ate because the homemade ones were better), and my sister insisted on Stove Top (which no one made because the homemade smelled so much better).  The only thing not homemade was the dinner rolls, which were an accident because we forgot to put the homemade bread in the breadmaker.

The crowd-winning favorite was the Homemade Green Bean Cassorole with home-fried shallots and homemade Cream of Mushroom Soup (recipe to follow in another post).
For dessert, I made a Cheesecake using my father-in-law's recipe.  It was to die for! I used leftover cranberry sauce for the topping.
I also used a Silky Pumpkin Pie recipe, but it pretty much just tasted like Pumpkin Pie.  The Cheesecake was better.